With a sad heart I must announce that Debra passed away in July 2015. She had been ill for most of her adult life but she never showed it.
We will never forget her.
Posted by her husband Curtis Hensley

Saturday, June 20, 2015
Crazy4Challenges - week 3
Hi Friends!
It's week 3 in the June Crazy4Challenges challenge month. I was invited to play along this month by my fellow ECD DT member Frances Byrne. It's been fun to participate in the different challenges! This week is based on this card sketch.

Here is the card I created:

Recently on the Elizabeth Craft Designs blog, Judy Kauffman created a project where she cut flowers from the negatives from a sheet of glitter dots adhered to shimmer sheetz. I love the look so much I wanted to try it. I had the negatives from a sheet of black and silver glitter dots (7018) and adhered it to white cardstock. I diecut the flowers with Bunch of Flowers 4 (1030) from the dots and some pink pattern paper. The silver Happy Birthday (2577) and black borders (1016) are also from ECD. The sketch worked perfectly to showcase the unique flowers.
Here is a close-up

Using the negatives doubles the use of the sheet of glitter dots and creates some really fun, unique flowers to liven up any project!
Don't forget to visit the C4C blog and see all the other amazing creations.
Thanks for stopping by! Have a great weekend!
Maritime Joy Fold Card- ECD Blog post
Hi Friends,
I'm featured on the Elizabeth Craft Designs blog today with a fun joy fold card perfect for a last minute Father's Day Card. Stop by and see quick and easy this card is to make and give it a try!

I'm featured on the Elizabeth Craft Designs blog today with a fun joy fold card perfect for a last minute Father's Day Card. Stop by and see quick and easy this card is to make and give it a try!

Saturday, June 13, 2015
Crazy4Challenges - week 2
Hi Friends,
It's week 2 in the Crazy4Challenges June challenge month. My friend Frances Byrne invited me to be a guest designer this month and I am enjoying it so much! Thanks for all the kind words about last weeks card. Unfortunately, I injured a nerve in my leg a few days ago and have not been online much to visit the other blogs but I will soon- can't wait to see all to the amazing creations!
This weeks theme was in honor of Father's Day - to create a masculine card.

The image is from Lili of the Valley- isn't he cute! He is colored with Copic Markers. The card itself was designed by Sharon Fontenot- a friend and amazing card designer. I love the addition of the chain on the lamp. So fun. I'll be giving this card to my Dad so shhh...don't tell :-)
Don't forget to visit all the other blogs participating in the challenge. You will be truly inspired by the talent of the challenge team!
Thanks for stopping by!
It's week 2 in the Crazy4Challenges June challenge month. My friend Frances Byrne invited me to be a guest designer this month and I am enjoying it so much! Thanks for all the kind words about last weeks card. Unfortunately, I injured a nerve in my leg a few days ago and have not been online much to visit the other blogs but I will soon- can't wait to see all to the amazing creations!
This weeks theme was in honor of Father's Day - to create a masculine card.

Skin:
E00, E21, E11, E04
Hair:
E33, E35, E37
Chair:
R29, R59, R89 Legs-E39
Clothes:
YG93, YG95, YG97
Newspaper:
E51, W0, W1
Slippers:
BG49, 0
Gift:
BG49, BG18
Floor:
W1, W3
Slippers
and bow: Spica 21- Lipstick
Shadow:
W1
Don't forget to visit all the other blogs participating in the challenge. You will be truly inspired by the talent of the challenge team!
Thanks for stopping by!
Friday, June 12, 2015
You're the Sweetest
Hi Friends!
It's been a crazy week for me. I injured a nerve on the side of my leg and consequently my foot is numb and I can hardly walk. It's going to take up to 6 weeks to heal- ugh! As a result I have not been on the computer much. I am feeling a bit better today so I went through some of my files and found this fun card from my card class last month to share with you.
Front- closed

Open

View from above

The card features one of the new Elizabeth Craft Designs dies - Ice Cream Cone. Of course I used Silk Microfine Glitter on the ice cream scoops and cherry for some added glitz. The easel card uses the circle from Stand Up Helpers 2 as a stopper. These dies are designed to use as stoppers and make easel cards so easy to make. The sentiment and papers are from my stash.
I'm going to keep this short and sweet today, just like me.. gotta go put the leg up.
Thanks for stopping by! I hope you have a great day!
Saturday, June 6, 2015
Craziy4Challenges Guest Designer
Hi Friends,
I was invited by the wonderfully talented Frances Byrne to participate in this month's Crazy4Challenges group. The first challenge is to celebrate the return of sunshine in our lives and create a card with sunshine, yellow or anything else related to the sun.

I was invited by the wonderfully talented Frances Byrne to participate in this month's Crazy4Challenges group. The first challenge is to celebrate the return of sunshine in our lives and create a card with sunshine, yellow or anything else related to the sun.

The card I created features this adorable little guy heading to the beach - a digi stamp called My Beach Boy from Tiddlyinks. He is colored with Copics. The wave edge is from Karen Burniston's Beach Edges (981) cut on Bazzill Bling cardstock. The sentiments were some old ones from my stash. I added a little clear Wink of Stella for some sparkle.
Here are the Copic colors I used:
Skin: E00, E01, E11, E13, R20
Hair: E31, E33, E37
Shorts: B04, B06, Spica 08- Turquoise
Shirt: G02, G05
Sun/Shoes: Y08, Y19, Clear Wink of Stella
Crab/Flag: R08, R17, R59
Shovel/Pail: Y19, YR04
Sand Castle/Sand: E00, E31, E34, E42, W3, Clear Wink of Stella
Dog: W0, W1, W3
Sky: B00
Thanks for stopping by today! I am looking to the rest of the month and sharing more fun challenge cards with you!
Sunday, May 31, 2015
May Design Challenge- Follow Your Heart
Hi Everyone!
Today is the day for the Elizabeth Craft Designs- Design Team Challenge for May. The theme this month was to use one of our new large stone, bricks or circles dies.

Today is the day for the Elizabeth Craft Designs- Design Team Challenge for May. The theme this month was to use one of our new large stone, bricks or circles dies.

The bricks were calling to me to make them into the Yellow Brick Road which inspired me to create this card. I diecut the bricks twice from yellow bling cardstock to make it extra long. I wanted the road to get wider as it went so I used some of the bricks from the extra piece to fill in on the sides to make it wider, Worked perfectly! Next I needed the ruby slippers- I used the beautiful shoes/feet from Jackie's Dolls 1 Peel-Offs- glittered and colored with E01 and R39 Copic. I diecut the letters for the word FOLLOW from Alphabet 1- Caps and adhered them to a strip of vellum. The word "your" is cut from an old book- I thought it would be a nice nod to the Wizard of Oz to use real book text. A glittered heart finishes it off.
Don't forget to visit the ECD blog for links to all the other amazing Design Team projects You will be inspired!
Thanks for stopping by today! Remember to always follow your heart!
Wednesday, May 27, 2015
Yellow Rose of Texas
Hi Friends,
Being a Texan, the song The Yellow Rose of Texas inspired me to create this card featuring Susan's Gardens Garden Note -Rose 2 die. The sweet rose and bud were perfect to create a tag card with Texas flag colors and 2 yellow roses.


Being a Texan, the song The Yellow Rose of Texas inspired me to create this card featuring Susan's Gardens Garden Note -Rose 2 die. The sweet rose and bud were perfect to create a tag card with Texas flag colors and 2 yellow roses.


For the card, I diecut the base with Tags & More 7- Vine, embossed the front with Lots of Dots embossing folder and added the pattern paper. Next I diecut the Tags & More 4- Flourish tag to build my roses on. You can see a video explaining how to create these Roses from Susan HERE. A few strips of Glitter Stars Border and some ribbon and the card is complete.
Garden Notes dies are perfect for cards and easy to put together. Give the Rose 2 a try and create your own special card!
Thanks for stopping by today!
Monday, May 25, 2015
Flower Shop- Susan's Garden DT blogpost
Hi Friends!
I'm featured on the Elizabeth Craft Designs blog today with a post for Susan's Gardens Design Team. Come on over and see how I made this card using the Country Scapes line of dies. I just love the way you can customize your story!

I'm featured on the Elizabeth Craft Designs blog today with a post for Susan's Gardens Design Team. Come on over and see how I made this card using the Country Scapes line of dies. I just love the way you can customize your story!

Wednesday, May 20, 2015
Watercolor and Sequins!
Hi Friends,
Today I am sharing a card with you I created for my card class this month. I've been fascinated by sequins lately and finally got some to play with. This card is inspired by Kristina Werner - she plays around with inks and vellum and sequins a lot and I always love the look.

Today I am sharing a card with you I created for my card class this month. I've been fascinated by sequins lately and finally got some to play with. This card is inspired by Kristina Werner - she plays around with inks and vellum and sequins a lot and I always love the look.

Wartercolor
Inked Sequin Card
Fold
card base in half. Stamp sentiment on vellum with Versa Mark Ink. Be
sure to use the embossing buddy before stamping. Set aside. Create
the inked background. Dribble each color of Distress ink/mist on the
top of the water color paper, varying the colors. Tilt card upright
and spritz with water to make colors run. Keep
adding colors and drying until the desired look is achieved. Sprinkle
with inks to get droplets. Spritz with both mists for the pearlized
sheen. Add a few lines of blue Wink of Stella. Dry. Adhere to card front.
Adhere vellum sentiment strip about 1” from bottom. I used tiny
gluedots that can be covered with sequins. Add sequins to complete.
Thanks for stopping by today! Hope you are inspired to get out your inks and some water color paper and let your inner artist out!
Saturday, May 2, 2015
Floral Cupcake Birthday Card
Hi Friends!
Today is my day to share a project on the ECD blog. Come on over and see how I created this flowertabulous card using the new Bunch of Flowers 4 dies from the Spring release. Love it!!

Today is my day to share a project on the ECD blog. Come on over and see how I created this flowertabulous card using the new Bunch of Flowers 4 dies from the Spring release. Love it!!
Thursday, April 30, 2015
Elizabeth Craft Designs April DT challenge- baby!
Hi Everyone!
It's the end of the month at that means its time for the ECD Design Team challenge. This month's theme was babies- in honor of the impending arrival of baby girl Van De Burgt ( Congrats Joset and Grandma Els!) Be sure to visit the Elizabeth Craft Designs blog to see all the design team creations - you are sure to be inspired!

I had a lovely time creating this sweet baby card. The image is from Lily of the Valley colored with Copic Markers. I wanted the background paper to resemble a baby blanket- using the Swirly Curves embossing folder created the look of quilting on the pattern paper perfectly! I used the Congratulations Stand Up Helper to frame the colored image. The flowers are cut from Bunch of Flowers 2. I inked the flowers with Vintage Photo Distress Ink and shaped them with the loop tool on the mini molding pad. The leaves are from Curvy Leaves and are also inked. The finishing touch is the beautiful Glitter Border.
Here are some close ups:


730 Curvy Leaves
935 Congratulations Stand Up Helper
E119 Swirly Curves Embossing Folder
7010 Glitter Borders Assorted Colors
7018 Glitter Dots Assorted Colors
It's the end of the month at that means its time for the ECD Design Team challenge. This month's theme was babies- in honor of the impending arrival of baby girl Van De Burgt ( Congrats Joset and Grandma Els!) Be sure to visit the Elizabeth Craft Designs blog to see all the design team creations - you are sure to be inspired!
I had a lovely time creating this sweet baby card. The image is from Lily of the Valley colored with Copic Markers. I wanted the background paper to resemble a baby blanket- using the Swirly Curves embossing folder created the look of quilting on the pattern paper perfectly! I used the Congratulations Stand Up Helper to frame the colored image. The flowers are cut from Bunch of Flowers 2. I inked the flowers with Vintage Photo Distress Ink and shaped them with the loop tool on the mini molding pad. The leaves are from Curvy Leaves and are also inked. The finishing touch is the beautiful Glitter Border.
Here are some close ups:
Thanks for stopping by today! I appreciate comments so leave me some love and let me know what you think of this month's DT Challenge.
Elizabeth Craft Designs products used:
729 Bunch of Flowers 2730 Curvy Leaves
935 Congratulations Stand Up Helper
E119 Swirly Curves Embossing Folder
7010 Glitter Borders Assorted Colors
7018 Glitter Dots Assorted Colors
Monday, April 27, 2015
Susan's Garden- Country Scapes- Planted in Faith
Hi Everyone!
I am featured on the Elizabeth Craft Designs Blog today for Susan's Garden Design Team. Come and see how I made this little slice of heaven using Susan's Garden Country Scape dies- they are so much fun!

I am featured on the Elizabeth Craft Designs Blog today for Susan's Garden Design Team. Come and see how I made this little slice of heaven using Susan's Garden Country Scape dies- they are so much fun!
Have a great week!
Debra
Friday, April 24, 2015
It's the Little Things
Hi Everyone!,
I wanted to share a card I created for DistINKtive cards this month featuring Karen Burniston's Bathtub die and Elizabeth Craft Designs' new Leafy Branch and Flourish & Branches dies from the ECD Spring Release. It's hard to see in the photo but I covered the tub with Glossy Accents to give it a shiny enamel look. Don't you just want to hop in?

I wanted to share a card I created for DistINKtive cards this month featuring Karen Burniston's Bathtub die and Elizabeth Craft Designs' new Leafy Branch and Flourish & Branches dies from the ECD Spring Release. It's hard to see in the photo but I covered the tub with Glossy Accents to give it a shiny enamel look. Don't you just want to hop in?
Instructions:
Fold
card base in half. Paint a thin layer of Glossy Accents on bathtub
and set aside to dry. Ink long white strip with both Stormy Sky and Broken China Distress inks, cover
with a thin layer of Stickles and set aside to dry. Ink teal
cardstock and pattern paper piece with Broken China distress ink.
Adhere to card front. Ink small rectangle with blue inks lightly.
Stamp with sentiment in black ink. Diecut 4 sets of bubbles from
inked and stickled cardstock. Diecut 1 Leafy Branch from green cardstock and then clip branches off from one side. Adhere branch to bottom of card front. Add faucet and feet to
tub. Adhere to card front on pop dots. Add bubbles. Add remaining clipped branches. Diecut 3 Flourishes from teal cardstock. Add to card front as shown. Tie black twine into a bow.
Adhere sentiment on pop dots. Add bow above. Add glitter flowers. Add
pattern strip and bubbles to inside top of card to complete.
Thanks for stopping by today! Have a great weekend! XX
7048 Glitter Flowers - transparent gold
Monday, April 13, 2015
Karen Burnistons' Designer Challenge- Accordion with Friends
Hi Everyone!
I'm excited to share this Star Accordion card that I created as a guest designer for Karen Burniston's Designer Challenge this month. I love Karen's interactive dies and thought the Star Accordion would be so much fun!


Glittered Monkey Star Buddy:


I'm excited to share this Star Accordion card that I created as a guest designer for Karen Burniston's Designer Challenge this month. I love Karen's interactive dies and thought the Star Accordion would be so much fun!
Back view open
Back view closed
Karen's accordion dies do all the work for you and make it easy to create unique cards sure to impress!
Here's how I created this card-
Diecut the following:
- 2 Star Accordion panels - white cardstock.
- 2 center star only from the main panel die - yellow cardstock
- 2 decorator stars - yellow cardstock
- 3 Palm Trees -tan cardstock
- 3 strips of grass- tan cardstock
- 10 Scalloped Fancy Frame edges- yellow cardstock
- 13 balloons - pattern paper
- 1 spinner - clear acetate
Glittered Monkey Star Buddy:
- Adhere transparent double sided adhesive to a piece of white cardstock large enough for the Star Buddy Peel-Off. Remove liner. Place Silver Star Buddies Monkey on adhesive sticky side down. Cover with Warm Diamond Silk Microfine Glitter. Brush off excess and polish with your finger to bring up shine and set glitter.
- Color with Copic Markers-E42, E57, G12, 0
- Trim out closely
Assemble Card- adhere base panels together, trimming off extra tab on right side. Adhere Fancy Frame edges to both inside panels and top and left of front panel. Adhere large stars to inside center and smaller stars to back side of panels. Adhere glittered Star Buddy panel to inside left side ( this will flip to the front when closed) Using a transfer sheet, adhere Star Buddy negative to back of right panel. Ink grass strips and tops of palm trees with Aloe Vera Versamagic ink. Adhere trees, lined up with each other, as shown. Ink balloons with Aloe Vera. Add white twine. Adhere clear spinner inside top of card. Adhere balloon cluster to spinner.( the spinner gives the balloons extra height for that wow factor!) Add additional balloons to front and inside as shown. Add Happy Birthday and stamped sentiment to inside right center. Decorate with stars and circles from Star Buddies Peel-off to complete.
Here are some top side views:
Thanks for stopping by today! Don't forget to visit the Elizabeth Craft Designs blog on April 15 to see all of the Designer Challenge creations from Karen's amazing Design Team.
974 Rectangle Pull Card ( spinner)
916 Spiral Circle Pull Card (balloons)
Saturday, April 4, 2015
Bamboo Trellis Easter Basket- ECD Blogpost
Hi Friends!
Happy Easter! It's my turn on the Elizabeth Craft Designs blog today. Come on by and see how I created this Easter Basket card using the Bamboo Trellis die and Mini Egg Peel-offs. So much fun!

Happy Easter! It's my turn on the Elizabeth Craft Designs blog today. Come on by and see how I created this Easter Basket card using the Bamboo Trellis die and Mini Egg Peel-offs. So much fun!
Friday, April 3, 2015
Wishing You Sunshine

Hi Friends!
Today I'd like to share a card we made in my Copic Cards class at Scrapp'n Savvy. This adorable LaLa Land Bumble Bee Marci was so much fun to color. The Daisies from ECD's Garden Patch 1" & Mini Daisy & Chrysanthemum were the perfect embellishment to bring this card to life!
Bumble Bee Marci
Skin: E00, E02, E11, E13,
BV00, R20, R21
Hair: YR21, Y15, YR24, Y28
Shirt (yellow part): Y11, Y08,
Y15, Y19
Shirt (black part)- BV31,
BV23, BV25, C7 black Spica
Skirt- Y08, Y15, Y19, Y23, Y28
Shoes: Y08, Y19, Y28
Wings: B000, B02, BG53
Flowers: C1, Y15, BG23
Opaque White
Tuesday, March 31, 2015
March ECD Design Team Challenge- Flowers!!
I love flowers! They make me smile and bring me joy. This month's theme for the Elizabeth Craft Designs design team challenge was...you guessed it- flowers! I used the new Garden Notes Hydrangea and our beautiful Asian Vase to create this card.


Card Base- standard A2 size from white cardstock (5 1/2" x 8 1/2" folded in half). Cut a piece of pattern paper to 4" x 5 1/4" and a strip of a coordinating pattern paper to 4" x 2". Ink with brown ink and adhere to front.
Vase - Diecut Asian Vase from White Iridescent Shimmer Sheetz. Emboss with Lots of Dots Embossing Folder. Ink outer edge with brown ink. Adhere to card front on foam adhesive.
Flowers- Diecut stems, leaves and petals from Garden Notes- Hydrangea. To get the variety of color for the petals, ink a piece of cream colored cardstock with VersaMagic ink mixing the following colors on the cardstock- Aegean Blue, Sea Breeze and Tea Leaves. Diecut 6 sets of petals. 6 stems and 6 sets of leaves. Shape and assemble directly on the card. You can see a video tutorial of how to assemble these flowers HERE.
To complete add Gold Corners and Borders to card front.
Thanks for stopping by today! To see all the other amazing floral creations from out Design Team members head over to the Elizabeth Craft Designs blog and be prepared to be amazed!
Monday, March 30, 2015
H is for.....
Hensley of course!!

Hi Friends!
This week at Scrapp'n Savvy we hosted our quarterly Sampler. During this time all the teachers come in talk about upcoming classes and we do a project with the customers. This time we got to make a monogram letter. The teachers were asked to each do one representing some aspect of what we teach. I knew I wanted to showcase flowers some how and thought it would be fun to use the Garden Notes- Bluebonnets from ECD. I went the "Texas" route of course and also used the 3D star from the Karen Burniston's Star Accordion die to incorporate the Lone Star. The letter was stained and then decoupaged with the bandanna paper. The silk flowers were provided. What do you think?Don't those gorgeous Bluebonnets look real?! It was fun to make and will be a great piece of home decor.
This week at Scrapp'n Savvy we hosted our quarterly Sampler. During this time all the teachers come in talk about upcoming classes and we do a project with the customers. This time we got to make a monogram letter. The teachers were asked to each do one representing some aspect of what we teach. I knew I wanted to showcase flowers some how and thought it would be fun to use the Garden Notes- Bluebonnets from ECD. I went the "Texas" route of course and also used the 3D star from the Karen Burniston's Star Accordion die to incorporate the Lone Star. The letter was stained and then decoupaged with the bandanna paper. The silk flowers were provided. What do you think?Don't those gorgeous Bluebonnets look real?! It was fun to make and will be a great piece of home decor.
Thursday, March 26, 2015
Watercolor and Acetate Card
Hi Everyone!
Here is another card we made in class this month. I came across this fun watercolor and ink technique on Pinterest and wanted to give it a try. I love how it turned out. Elizabeth Craft Designs large Happy Birthday die was the perfect size to add to the front.
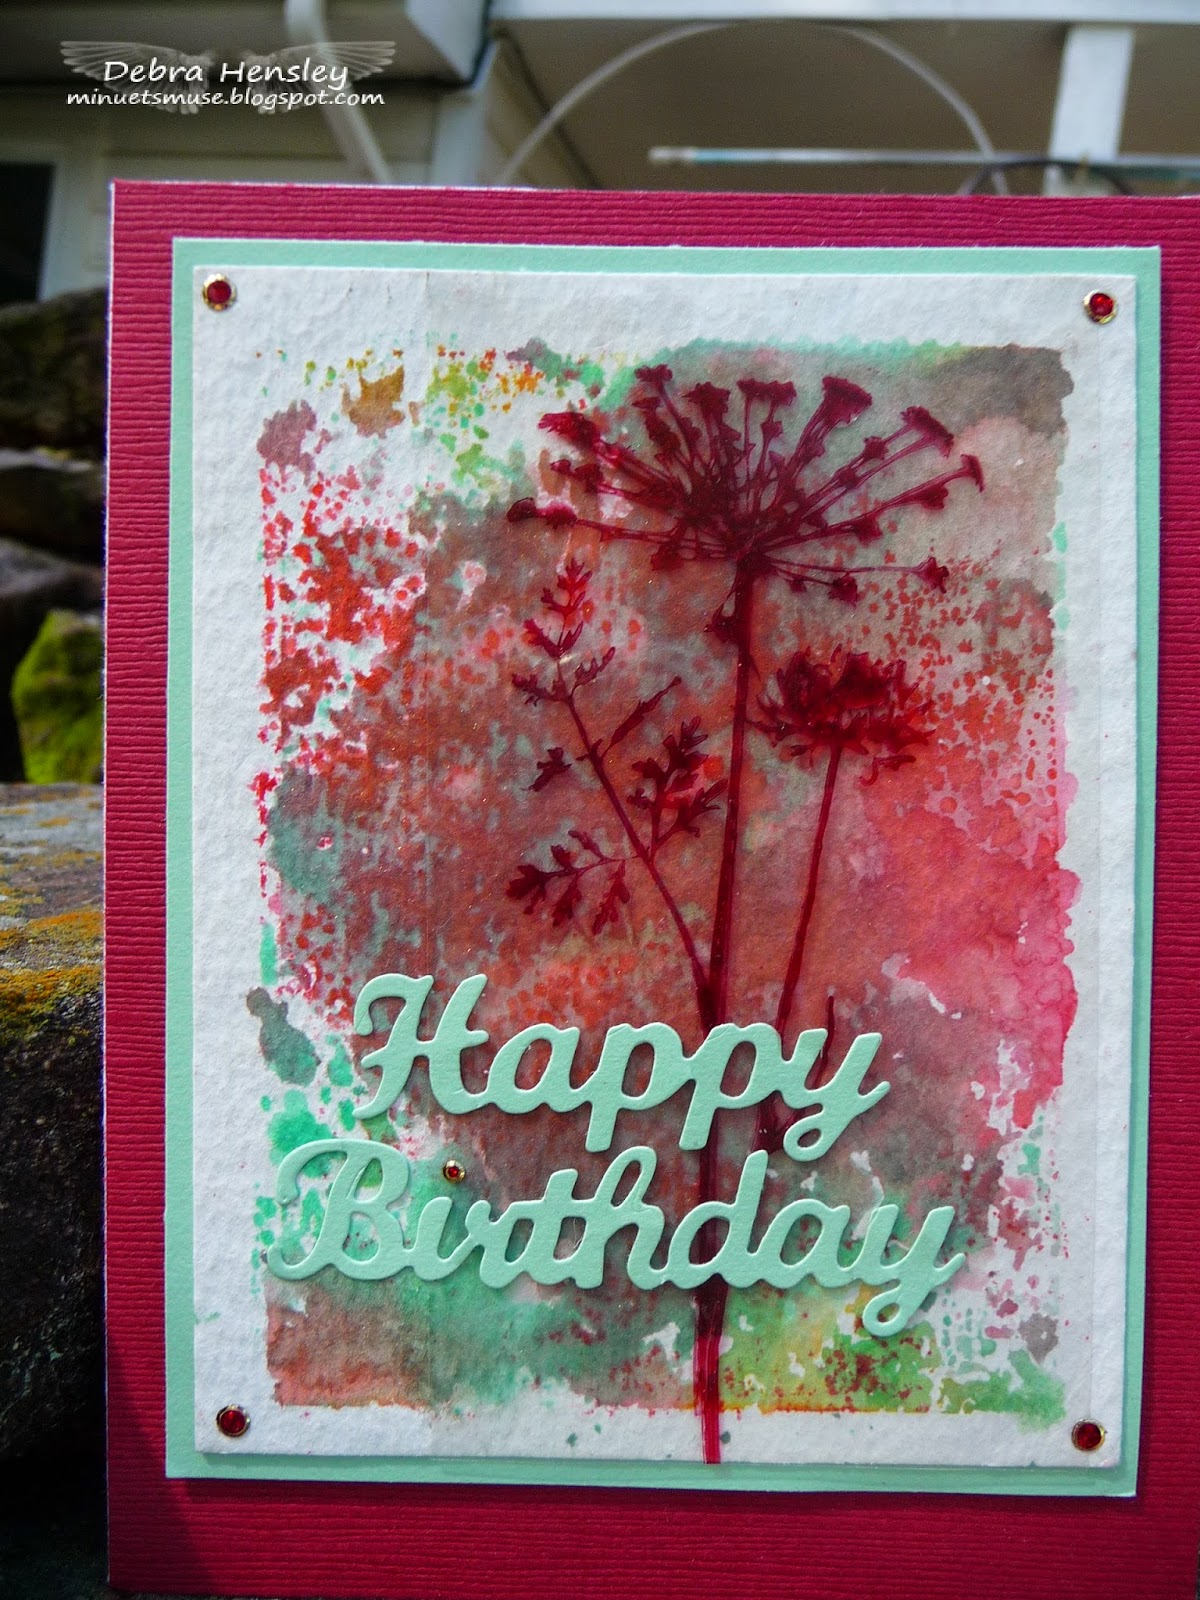
Here is another card we made in class this month. I came across this fun watercolor and ink technique on Pinterest and wanted to give it a try. I love how it turned out. Elizabeth Craft Designs large Happy Birthday die was the perfect size to add to the front.
Instructions:
Adhere
red cardstock to front of a standard A2 size card base. Make watercolor background.
Watercolor
Background:
Press
Distress Ink pads on acrylic block in different spots. Colors used-
Abandoned Coral, Cracked Pistachio, Wild Honey, Festive Berries.
Spritz well with water from a mister. Flip block over and stamp,
centered onto watercolor paper. Let the block sit for a few seconds
on the paper so the colors will be absorbed. Lift off block. Repeat
as desired until you achieve a look you like. Dry with heat tool.
Spritz with bronze mist. Dry
Stamp
flower on acetate strip with Stazon Ink. Be careful not to let the
stamp move on the acetate or it will smear. Set aside to dry. Adhere
watercolor piece to green mat. Adhere dry acetate piece to watercolor
paper about 1/8” from right side. Using mini glue dots positioned
behind the thickest parts of the stamped image will secure the
acetate without showing on the front. Add to watercolor piece to
card front on pop dots. Diecut Happy Birthday from green cardstock.
Adhere to card front over watercolor and acetate about 3/4” from
bottom. Add glitter dots to corners..
Monday, March 23, 2015
Susan's Garden Blogpost- Peony
Hi Friends!
Today is my turn to share a project with you for Susan's Garden Design Team on the ECD Blog. I am absolutely loving the Garden Notes collection of Flower dies- they fit so perfectly on cards. I created this Peony card using one of Susan's beautiful sentiment stamps as well. Come see how I made this card and give it a try!

Today is my turn to share a project with you for Susan's Garden Design Team on the ECD Blog. I am absolutely loving the Garden Notes collection of Flower dies- they fit so perfectly on cards. I created this Peony card using one of Susan's beautiful sentiment stamps as well. Come see how I made this card and give it a try!
Saturday, March 21, 2015
ECD Blogpost- Inked Embossing Folder Rose Card
Hi Everyone!
It's my turn to share a project on the Elizabeth Craft Design's blog. Stop by and see a fun technique using an embossing folder to create this easy and beautiful card! I'd love to hear what you think!

It's my turn to share a project on the Elizabeth Craft Design's blog. Stop by and see a fun technique using an embossing folder to create this easy and beautiful card! I'd love to hear what you think!
Thursday, March 19, 2015
Ready for Some Sunshine!
Hi Friends,
I had a great DistINKtive card class this week at Scrapp's Savvy. We made some fun cards! The weather here in Texas has been warming up and I have had the beach on my mind! I've been dying to play with Rocky the Crab and all the fun Beach themed dies from Karen Burniston and finally got the chance for this month's class. Isn't he cute?!

I had a great DistINKtive card class this week at Scrapp's Savvy. We made some fun cards! The weather here in Texas has been warming up and I have had the beach on my mind! I've been dying to play with Rocky the Crab and all the fun Beach themed dies from Karen Burniston and finally got the chance for this month's class. Isn't he cute?!
Directions:
Fold card base in half.
Diecut Rocky the crab- shadow layer from black, detail layer and
shovel from red, eyes and 3 seashells from white. Assemble. Diecut
waves from blue cardstock. Diecut sand hills and palm tree hill from
tan cardstock. Diecut palm tree from brown and palm leaves from
green. Adhere leaves to top of brown tree.
Ink
sky with white ink to simulate clouds. Ink sand piece with brown ink
and spritz with bronze mist. Scribble some brown Wink of Stella on a
craft mat and gently press shells into ink. Draw lines on palm
trunk. Color mini palm trees- leaves with green distress marker and
trunks with brown distress marker. Clip off small palm from right
side of diecut. Color sun with yellow Wink of Stella. Ink waves with
blue ink and color wave edges with white ink or white Wink of Stella.
Assemble
card. Adhere palm sand layer flush, starting about 2” from bottom.
Add second layer on pop dots. Add waves flush with bottom on pop dots
on bottom edge only. Add palm tree with pop dots on top of tree. Add
sun and sentiment to top of card. Add Rocky on pop dots. Add pail and
shells as shown. Add negative of wave piece to top inside of card and
small palm tree to bottom right to complete.
Thanks for stopping by!
Have a great sunny day!
You can get these fun dies at your local scrapbook store ( like Scrapp'n Savvy!) or online at the Elizabeth Craft Designs website. Here are the links:
972 Accordion Rectangle ( speech bubble)
Tuesday, March 10, 2015
February Copic Cards Class
Hi Everyone!
We had a wonderful Copic Card class last month and I finally have a chance to share the cards we did with you. The first image uses the stamp set Gazebo TF( tri-fold) from Art Impressions. The set comes with three stamps that can be used separately or together in a tri fold card. Colored with Copic markers in a relaxed style I like to call Loosy Goosy... more of an impressionist look, not worrying about precise blending and using lots of loose squiggles to layer colors. I love the effect!
 '
'


We had a wonderful Copic Card class last month and I finally have a chance to share the cards we did with you. The first image uses the stamp set Gazebo TF( tri-fold) from Art Impressions. The set comes with three stamps that can be used separately or together in a tri fold card. Colored with Copic markers in a relaxed style I like to call Loosy Goosy... more of an impressionist look, not worrying about precise blending and using lots of loose squiggles to layer colors. I love the effect!
Front
'
Inside
Right side
Left side
Copic Colors used:
Sign Panel
Sign: BV20, E55, R24, YG25
Box 1: R24, R46, BV20
Box 2: YG01, YG25, YG17, BV20,
BV13
Box 3: BV20, BV04, V17, BV06,
V06
Grass: YG01, G12, YG25, YG17
Shadow:BV20
Cake Panel
Cake: 0, R24, BV04, V17, V06,
YR31
Flowers: R24, R46
Foliage: G12, YG01, YG25, YG17
Shadow: BV20, BV13, V17
Gazebo Panel:
Balloons: R24, R46
Gazebo/ Tree Branches: E55,
E57, E59
Lilacs/Shadows: BV20, BV13,
BV04, V17, BV08
Greenery: YG01, YG17, YG25,
G12
Ground: E55, E57, E59
The second card we did uses an image from Lili of the Valley- Hydrangeas. Love this one too! Colored the standard way with Copic Markers.
Copics Colors used:
Leaves: G94, G99
Flowers: BV00, V01, V06, V16,
BV13
Vase: E31, E33, BV00
Bow: YR31, E33
Present: YR31, G12, G94, W1
Shadow W1
Ground: BV00, E33, W1
Thanks for stopping by today! I hope you get a little inspiration or pull out your Copic Markers and color something fun today!
Saturday, March 7, 2015
ECD Blogpost- Copics on Glitter
Hi Everyone,
Today is my day to share a post on the Elizabeth Craft Designs blog. Stop by and see how I made this card. There are some great tips for coloring with alcohol based markers on Silk Microfine Glitter and Peel-offs. Let me know what you think!

Today is my day to share a post on the Elizabeth Craft Designs blog. Stop by and see how I made this card. There are some great tips for coloring with alcohol based markers on Silk Microfine Glitter and Peel-offs. Let me know what you think!
Saturday, February 28, 2015
Elizabeth Craft Designs February D T Challenge- Tags!
Hi Everyone!
It's the end of February and that means it's time for the Elizabeth Craft Designs February Design Team Challenge. This month's theme was to combine different tags and or the elements from the tag dies into a project. With such a variety of gorgeous tag dies to pick from this challenge was a lot of fun!
 '
'

It's the end of February and that means it's time for the Elizabeth Craft Designs February Design Team Challenge. This month's theme was to combine different tags and or the elements from the tag dies into a project. With such a variety of gorgeous tag dies to pick from this challenge was a lot of fun!
'
To make this card I created the base from Tags & More 7- Vine on gray cardstock. I embossed the card front with Lots of Dots embossing folder. I cut a smaller tag from Tags & More 4- Flourish and cut the decorator flourish from the pattern paper and added the negative pieces to the tag. I love how the edges on these two tags compliment each other so well. The pattern pieces are from Authentique. All pieces are inked with Vintage Photo distress ink- my favorite brown. The flower is the smallest Victorian Flower cut from cardstock with Transparent Double Sided Tape on it and then glittered with a combo of Orange and True Red Silk Microfine Glitter. A few strips of Red/Gold Glitter Borders, ribbon and a perfectly tiny sentiment Peel-Off in black to finish it off. *Note- I love the tiny sentiments in Assorted Words Peel-Off. There is a nice variety and they are perfect for cards that need a smaller sentiment that is easy to read and apply. Pick up a sheet!
An overhead look:
Don't forget to check out the other Design Team members creations on the Elizabeth Craft Designs Blog. You are sure to be inspired to think outside the box with your tag dies and create some unique and beautiful projects.
Thanks for stopping by today!
Debra
You can purchase the Elizabeth Craft Designs supplies used from your local Scrapbook store or directly from our online store by following the links below:
Monday, February 23, 2015
Susan's Garden- Sunflower Card
HI Friends!
I'm excited to share my first official blogpost on the Elizabeth Craft Designs blog as a Design Team member of Susan Tierney Cockburn's Susan's Garden Design Team. I've been creating Susan's gorgeous realistic flower dies for years and always love the results. Susan has joined the ECD family and has created a new line of flowers perfect for cards! Stop by the blog to see how I made this card. It's fun and easy!

I'm excited to share my first official blogpost on the Elizabeth Craft Designs blog as a Design Team member of Susan Tierney Cockburn's Susan's Garden Design Team. I've been creating Susan's gorgeous realistic flower dies for years and always love the results. Susan has joined the ECD family and has created a new line of flowers perfect for cards! Stop by the blog to see how I made this card. It's fun and easy!
Saturday, February 21, 2015
ECD Blogpost- Embossed Crystal Flower Cutout Card

Thursday, February 19, 2015
Buster Birthday Card!
Hi Crafty Friends!
When I created the PURRfect valentine card featuring Whiskers the Cat for my last ECD Blogpost I knew I wanted to do a similar version featuring Buster the Dog. We made the Buster version in my DistINKtive Cards class this month at Scrapp'n Savvy and it turned out so cute!


When I created the PURRfect valentine card featuring Whiskers the Cat for my last ECD Blogpost I knew I wanted to do a similar version featuring Buster the Dog. We made the Buster version in my DistINKtive Cards class this month at Scrapp'n Savvy and it turned out so cute!
The Rectangle Pull Card die makes this card a breeze to make! I used the new Cracked Pistachio Distress Ink to color the letters for WOOF, Buster's collar and to color the glittered heart Balloon and the dog bowl on the inside of the card. I used Shimmer Sheetz for the other two balloons and added them to the Spinner with strings anchored under the bowl full of bones. Buster is wearing a Teal colored Microfine Glittered birthday hat from Props 2 with a tiny pompom on the top- he's so cute!
Thanks for stopping by today! Try pairing up the Rectangle Pull Card, a cute Character and some accessory dies to create a fun card sure to bring a smile!
Elizabeth Craft Designs products used:
Saturday, February 7, 2015
ECD Blogpost- PURRfect Valentine
Hi Friends!
I'm featured on the Elizabeth Craft Designs blog today with an adorable card featuring the new Rectangle Pull Card and Whiskers the Cat. Check it out and leave me a comment to tell me what you think!
Have a great weekend!


I'm featured on the Elizabeth Craft Designs blog today with an adorable card featuring the new Rectangle Pull Card and Whiskers the Cat. Check it out and leave me a comment to tell me what you think!
Have a great weekend!
Wednesday, February 4, 2015
Bluebonnets

We had so much fun in Garden Club yesterday at Scrapp'n Savvy making Bluebonnets! Susan Tierney- Cockburn's new Garden Notes line from Elizabeth Craft Designs has amazing realistic flowers perfectly sized for cards. It was easy to assemble with stunning results. Feels like Spring is just around the corner and the fields will soon be filled with these gorgeous blue beauties!
Give the new Garden Notes series a try and create stunning flowers for your cards.
Thanks for stopping by today!
Subscribe to:
Posts (Atom)