Pages

Monday, June 30, 2014

ECD June Design Team Challenge- Cling Stickers!

Hi Everyone!
Did you know that you can make repositionable cling stickers from Peel-offs and Transfer sheets? Add a little glitter and copics and you have a cling sticker that can be used to decorate any slick surface- windows, laptops, tablets, phones, mirrors- the possibilities are endless!

Today I created a unique gift card- Everything you see on the front that is glittered is a repositionable cling sticker! They are stuck to the card front but will easily peel off to be placed anywhere the recipient would like.  It's a card and the clings are the gift!


You can view a video by Els that explains how to make the repositionable stickers HERE. Basically all you have to do is adhere double sided adhesive to a piece of transfer sheet the same size as your Peel-Off. Cover with Warm or Cool Diamond Silk Microfine Glitter and color as usual with your Copic Markers. Once colored trim out closely and lift it off the transfer sheet release sheet and you have a repositionable sticker great for gifting! I left the backing on my butterfly so that when I attached it to the card front I could fold the wings out a bit. You can see it on the picture below of the stickers added to the back of a Kindle. So fun!
I hope you give it a try- its fun and easy and sure to bring a smile to whomever the lucky recipient is.
Be sure to stop by the Elizabeth Craft Designs Blog to check out the post with all the other DT members challenge creations. They are all amazing and sure to inspire!

Thanks for stopping by!

Elizabeth Craft Designs Products used:
300 Happy Birthday Peel-Off
0412 Big Butterflies Peel- Off
600 Transfer Sheet 
1016 Lines Peel-Off
642 Cool Diamond Silk Microfine Glitter
Double Sided Adhesive

Copics Used: V17, V20, V22, V28, G94, G99

Thursday, June 26, 2014

Elizabeth Craft Designs new release Dies- Snowman!

HI All!
I'm so excited to help give a sneak peak of the new release of dies from Elizabeth Craft Designs. There are 27 new dies and they are all fantastic They will be available for purchase on July 15. I've been playing and creating with them for the last several days and I am in love with them all. I'll be sharing my cards with you over the next several days here on my blog and on FB. Also don't forget to check out the ECD Facebook Page for lots of samples from the whole Design Team- prepare to be amazed!

I've always been a softie for Snowmen and the new (sku 929)Snowman die just melts my heart. Isn't he cute? He comes with all the pieces you see on him plus buttons and a broom. Let me know what you think!

Thursday, June 12, 2014

A "Classic" Ride - ECD Blogpost

Hi Everyone!
Today is my turn to share a project on  the Elizabeth Craft Designs Blog. Come visit and see how I made this card- perfect for any of the special men in your life. It's fast and easy and a lot of fun to make!


Thursday, May 29, 2014

Hi Everyone,
Today is my day to share a tutorial  on the Elizabeth Craft Designs Blog. Stop on by to see how I created this card and if you feel inspired leave me a comment- I love hearing from you!


Wednesday, May 28, 2014

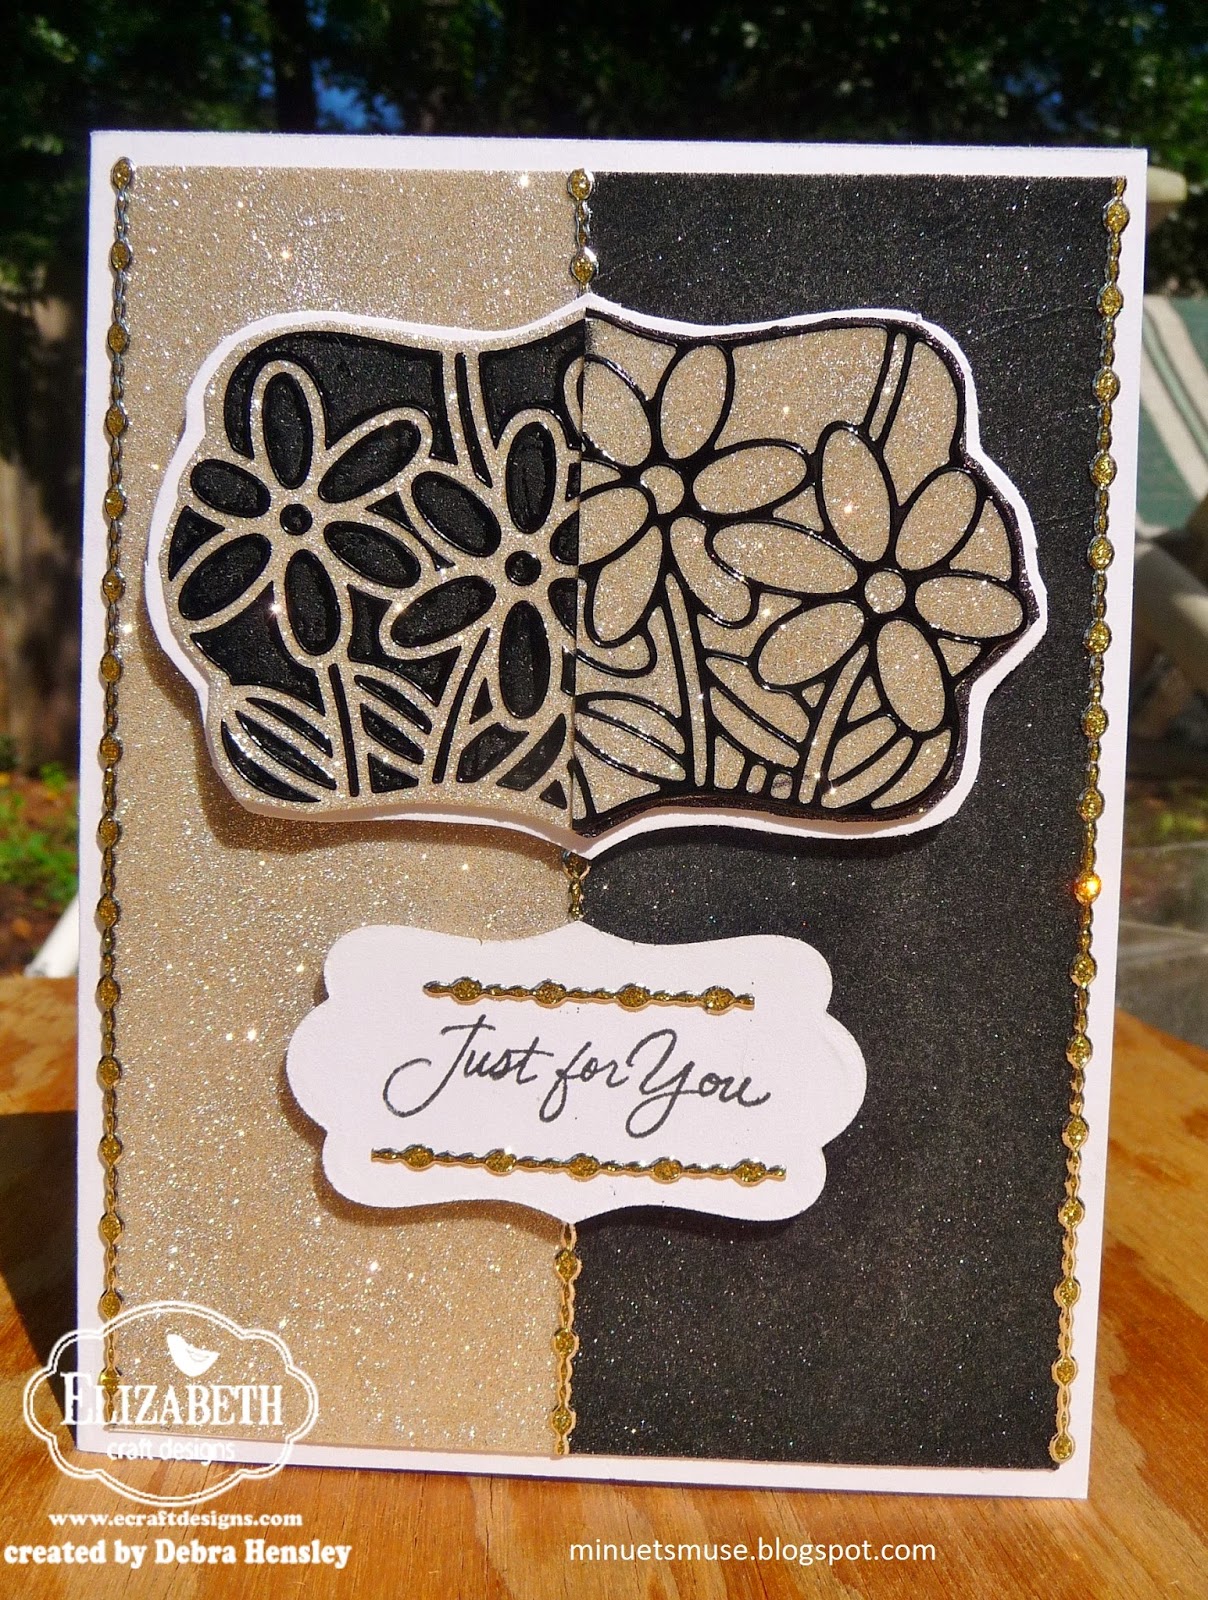
ECD May Design Team Challenge - Sparkly Split Negative Card

Hi Everyone!
It's the end of the month and that means it's time to share my card for the Elizabeth Craft Designs May Designer Team Challenge- flat cards. I've created a split negative card using lots of sparkly glitter and the positive and negative pieces of the Flower Labels 1 Peel- offs. I have to apologize- I have been down with the stomach flu and wasn't able to do a photo tutorial for you but I will walk you through the instructions and supplies. Hope you  enjoy the card!
 Instructions:
1. Fold a white 4 1/4 x 11 cardstock in half to form an A2 size card base. Cut a white piece to 4 x 5 1/4. Cover with double sided adhesive. Remove the release sheet and cut it in half with a paper trimmer. Place one half of the release sheet on the tape and sprinkle Basic Black Silk Microfine Glitter. Polish well before removing the release sheet.  Glitter the other side with Antique Silver Silk Microfine Glitter. Brush off excess and polish well to set.
2. Apply double sided adhesive to a piece of white cardstock big enough for the Peel- Off and another big enough for the negative. Apply the Peel-Off to the release sheet sticky side up and place the adhesive covered cardstock over it to transfer the Peel-Off. Glitter with Antique Silver and polish. Trim closely.
3 Glitter the remaining adhesive covered cardstock with Antique Silver. Using a transfer sheet, transfer the negative pieces of the Peel -Off to the glittered piece. Trim out leaving a slight edge.
4. Place both glittered pieces on top of each other, exactly lined up and cut in half with a paper trimmer. Match up one of each side, opposite the color of the base card below-for your focal image. This gives you the split negative look.Adhere to a white base, trimmed closely but leaving a slight edge.
5. Diecut white cardstock using the smallest of the Katie Label accessory dies. Stamp sentiment in black. Add Glitter Border Strips to sentiment and on card front down middle and both sides. Add split negative piece and sentiment on pop dots to complete.

Elizabeth Craft Products used:
601 Basic Black Silk Microfine Glitter
605 Antique Silver Silk Microfine Glitter
2568 Flower Labels 1 Peel-Off
600 Transfer Sheet
502 Double sided Adhesive Sheets
7010 Glitter Border Assorted- Silver/Gold
768 Katie Label Pivot Card Die

Wednesday, May 21, 2014

Hello Sunshine

Hello everyone!
Just a quick post today to share this card that I designed for my DistINKtive cards class last month at Scrapp'n Savvy.  I loved using the Pink Paislee Hello Sunshine stamp/diecut set and paper line. It was a fun card to make! One thing my students enjoyed learning was on the big yellow sentiment. We embossed it with white embossing powder and then went back with red ink and sponged it over the middle to make the word "happy" really pop. You then rub any residual ink off the embossing with a wet wipe and it looks fabulous!


Thursday, May 15, 2014

ECD Blogpost- Daisies for Any Occasion

HI Everyone!
Today I have the honor of having a new card and tutorial up on the Elizabeth Craft Designs Blog. Stop on by and see how I created this cheery card using the Daisy Die- one of my favorites! I'd love it if you leave a comment and let me know what you think!


Wednesday, May 7, 2014

Flowers in Oval in Color!

Hi Everyone!
Just  quick post today to share one of the cards I made for my DistINKtive Card class I taught yesterday at Scrapp'n Savvy. Everyone had a great time and made beautiful cards! The theme was cards with flowers so I decided to redo the card I designed for the ECD white on white DT challenge and do it with color. I love how it turned out!  I'll be sharing some of the other cards soon. Hope you enjoy!


Monday, April 28, 2014

Elizabeth Craft Design's DT Challenge- White on White

Hi Everyone!
It's time to share my creation for April's Elizabeth Craft Designs' Design Team Challenge. Every month the DT is given a theme to inspire a creation and then we share it with you at the end of that month.This month was especially fun- White on White with gold or silver accents- ahh the possibilities! There will be links to all the DT creations on the main ECD Blog on April 30th so check it out for some amazing White on White inspiration!


I love flowers and I love to make them! I knew I wanted lots on my card and using Elizabeth Craft Designs Bunch of Flowers 1 die was the perfect thing- three different flowers in three sizes. Ideal for making a wide variety of flowers. White on white can be a challenge because it can blend into itself and loose dimension. I combated this by using lots of textures and vellum mixed throughout my card.

Here's how I made this card:
1. Cut a 4 1/4 x 5 1/2 card base from white cardstock. Cut a white panel from Accordion Oval Card die and then clip out the center oval. Emboss the "frame" that is left with Swirly Curves embossing folder. Add foam adhesive to the oval frame.


2. Diecut a white trellis from the Bamboo Trellis die. Clip off the bottom portion of the trellis to make it fit in the oval frame, slightly off center to the left. Position the trellis on the card base and adhere. Add the popped up oval frame.

3. Cut a strip of vellum about 1 1/4 x 5. Clip a "v" out of one end for the banner look. Diecut Thinking of You in white. Adhere it to the vellum strip as shown.  Set aside.

4. Diecut 2 sets of white flowers and 4 sets of vellum flowers of each design in Bunches of Flowers 1. Diecut several white Curvy Leaves and a few from Gold Shimmer Sheetz. Diecut one small butterfly from the Butterfly Pivot Card die set in white.


5. Assemble the flowers by layering different combinations of white and vellum- shaping and cupping the flowers and then adding a gold brad to hold them together. Add veining on the leaves with a piercer for a more detailed look.


6. To complete the card, add each flower on a pop dot around 2/3 of the curve of the frame. Add white and gold leaves in to fill any gaps and add balance. Add the tiny butterfly. Adhere the vellum strip with the "v" end to the right and sticking past the edge of the card about 1/2 inch.

I hope you enjoyed my project for the White on White DT Challenge. I really enjoyed making it. Don't forget to check out all the other designers at the main Elizabeth Craft Designs Blog on the 30th for more inspiration!

Elizabeth Craft Designs Supplies used:
728 Bunches of Flowers 1
727 Bamboo Trellis
719 Thinking of You
730 Curvy Leaves
772 Accordion Oval Card
E119 Swirly Curves Embossing Folder
SS0212 Gold Metallic Shimmer Sheetz

Other supplies:
Gold mini brads
white cardstick
Vellum
pop dots
glue dots
piercer/pad
scissors
Ball stylus for cupping the flowers

Saturday, April 19, 2014

Tombow and Elizabeth Craft Designs Blog Hop!

Hi Everyone!

Welcome to the Tombow and Elizabeth Craft Designs  Blog Hop. If you're here from the Day 2 line up on the Tombow Blog then you’re in the right place! If you missed Day 1 head back to the Tombow blog to see all the great projects that have already been posted. 


There is a Prize to win! What to do? To be eligible to win, please comment on each of the designers projects and don't forget to "Like" TombowUSA and "Like" Elizabeth Craft Designs pages on Facebook.

Tombow will announce a winner on Monday April 21st at 3:30 P.M. EST.

Here's what you could win:
Elizabeth Craft Designs:


I've been using Tombow Dual Brush Pens for a long time and one of the techniques I love to do with them is to color on fabric. The colors stay so vibrant!  Elizabeth Craft Designs Peel- Off Outline Stickers work perfectly for the project I'd like to share with you today. 


Here are the steps to make this card:

1. Fold white card base in half.  With the Elizabeth Craft Designs Swirly Curves embossing folder, emboss a 4 x 5 1/4 piece of white cardstock. Ink edges with brown  ink, lightly and adhere to the base.

2. Attach the Daisies in Ovals Peel-Off sticker to a piece of muslin. Press down to secure well. Using Tombow Dual Brush Pens, color in the image one color at a time, using a heat tool to dry each color before adding the next to prevent bleeding. Blend lightly with the blender brush for a smooth look. When dry, fray the edges of the muslin for a vintage look.


Note: In the above image on the right side, you can see the first attempt I made at coloring on fabric with the outline sticker removed. ( another fun look you can achieve with this technique) and the bleeding that occurred because the fabric was too saturated. Take the time to dry the different colors for best results!

3. Glitter and color a butterfly from the Daisies in Ovals Peel-offs. Cut out and add to the right edge of the image with foam adhesive. Adhere the completed muslin to a yellow mat with Elizabeth Craft Designs double sided adhesive. Add "x" s made from strips of black Straight Borders Peel-Offs around the image to simulate stitches.

4. Fold a long strip of ribbon in half and adhere to the center of the card front with loop on the top. Add the muslin panel over the ribbon on foam adhesive to complete.

Elizabeth Craft Designs products used:

Tombow Dual Brush Pens in the following colors:
 452, 076, 055, 993, 373, 158, 977


Thanks for joining us on the Blog hop today! From here the next blog up is Rita Edwards.

Don't forget to leave a comment on each designer's blog to qualify for the amazing prize pack!